GTFS files integration |
[This is preliminary documentation and is subject to change.]
This topic contains the following sections:
The purpose of this tutorial is to help you understand how to build an ETL application with Eety. In this case, csv files are loaded into a Sql server database. You will also learn how to set bulk mode to speed up the overall process.
DOWNLOAD CSV FILEs FROM SNCF DEVELOPER WEB SITE
To download the csv files:
Click gtfs-lines-last.zip.
Unzip the CSV files.
CREATE THE SQL SERVER DATABASE
This topic describes how to create a database in SQL Server by using SQL Server Management Studio
To create the sql server database:
In Object Explorer, connect to an instance of the SQL Server Database Engine and then expand that instance.
Right-click Databases, and then click New Database.
In New Database, enter Gtfs name.
Load and run the Gtfs.sql script.
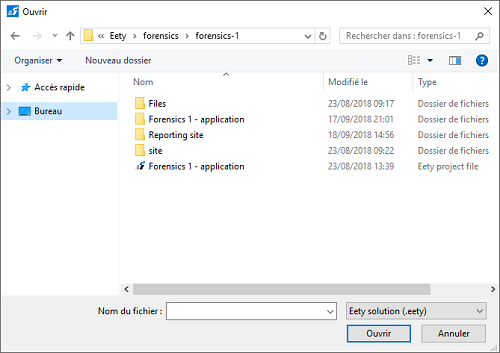
CREATE A NEW SOLUTION
Create an application solution:
|  |
DELIMITED TEXT FILES
Sncf lets you download a zip of gtfs CSV (comma separated values) files:
agency.txt
calendar.txt
calendar_dates.txt
routes.txt
stop_times.txt
stops.txt
trips.txt
Eety Eety provides a dsv (delimiter separated values) connector to extract these quotes.
ADD DELIMITED TEXT FILES CONNECTION
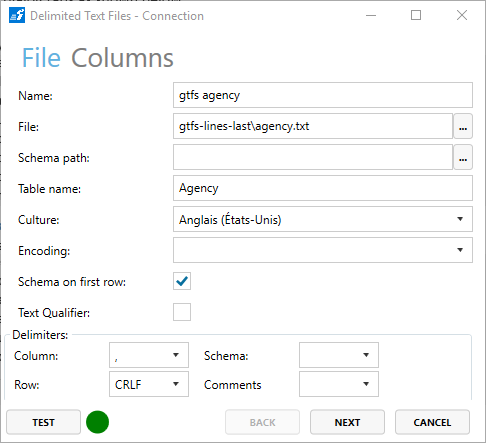
To create agency.txt file connection:
Right click on Connections node, in Solution Explorer pane.
Expand the Add connection menu.
Select Delimited Text File.
Fill the dialog box with the relevant values:
File Tab
Parameters
Values
Name
gtfs agency
File
gtfs-lines-last\agency.txt
Schema path
Table Name
Agency
Culture
English (united states)
Encoding
Schema on first row
Yes
Text Qualifier
False
Column delimiter
,
Row delimiter
CRLF
Schema
Comments
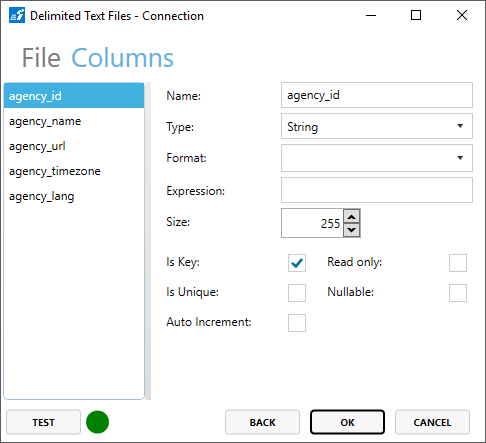
Columns Tab
Column
Type
Format
Is Key
agency_id
String
True
agency_name
String
agency_url
String
agency_timezone
String
agency_lang
String
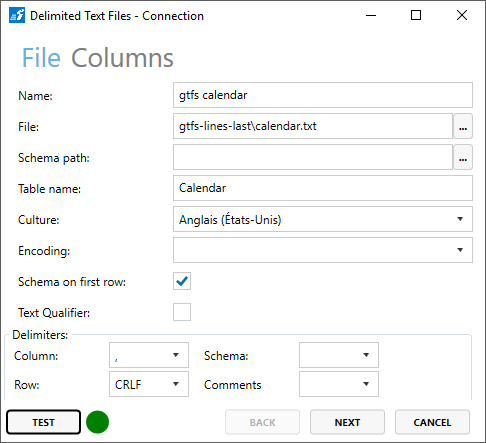
To create calendar.txt file connection:
Right click on Connections node, in Solution Explorer pane.
Expand the Add connection menu.
Select Delimited Text File.
Fill the dialog box with the relevant values:
File Tab
Parameters
Values
Name
gtfs calendar
File
gtfs-lines-last\calendar.txt
Schema path
Table Name
Calendar
Culture
English (united states)
Encoding
Schema on first row
Yes
Text Qualifier
False
Column delimiter
,
Row delimiter
CRLF
Schema
Comments
Columns Tab
Column
Type
Format
Is Key
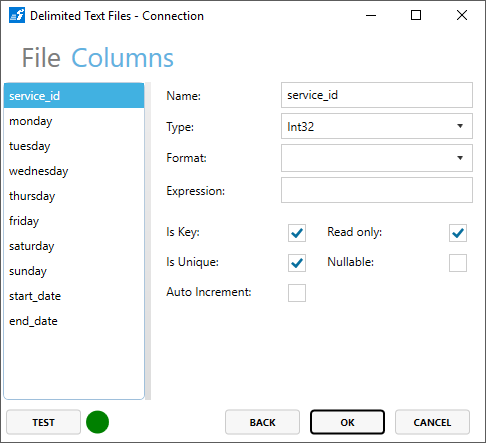
service_id
Int32
True
monday
Boolean
tuesday
Boolean
wednesday
Boolean
thursday
Boolean
friday
Boolean
saturday
Boolean
sunday
Boolean
start_date
DateTime
yyyyMMdd
end_date
DateTime
yyyyMMdd
To create calendar_dates.txt file connection:
Right click on Connections node, in Solution Explorer pane.
Expand the Add connection menu.
Select Delimited Text File.
Fill the dialog box with the relevant values:
File Tab
Parameters
Values
Name
gtfs calendar dates
File
gtfs-lines-last\calendar_dates.txt
Schema path
Table Name
CalendarDates
Culture
English (united states)
Encoding
Schema on first row
Yes
Text Qualifier
False
Column delimiter
,
Row delimiter
CRLF
Schema
Comments
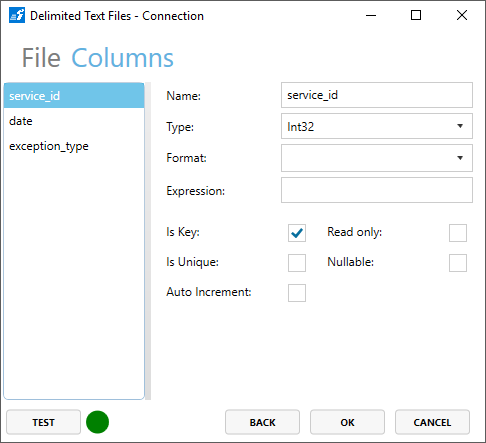
Columns Tab
Column
Type
Format
Is Key
service_id
Int32
True
date
DateTime
yyyyMMdd
True
exception_type
Byte
To create routes.txt file connection:
Right click on Connections node, in Solution Explorer pane.
Expand the Add connection menu.
Select Delimited Text File.
Fill the dialog box with the relevant values:
File Tab
Parameters
Values
Name
gtfs routes
File
gtfs-lines-last\routes.txt
Schema path
Table Name
Routes
Culture
English (united states)
Encoding
Schema on first row
Yes
Text Qualifier
False
Column delimiter
,
Row delimiter
CRLF
Schema
Comments
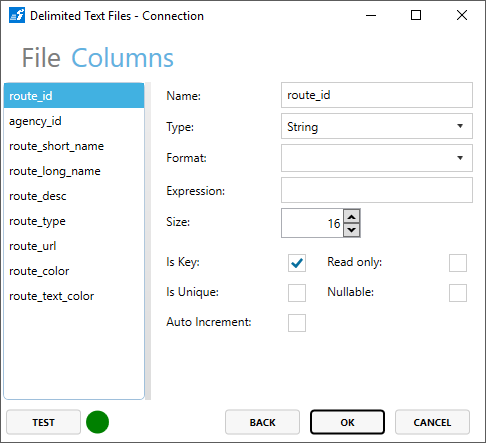
Columns Tab
Column
Type
Nullable
Is Key
route_id
String
True
agency_id
String
True
route_short_name
String
route_long_name
String
route_desc
String
route_type
Int16
route_url
String
True
route_color
String
True
route_text_color
String
True

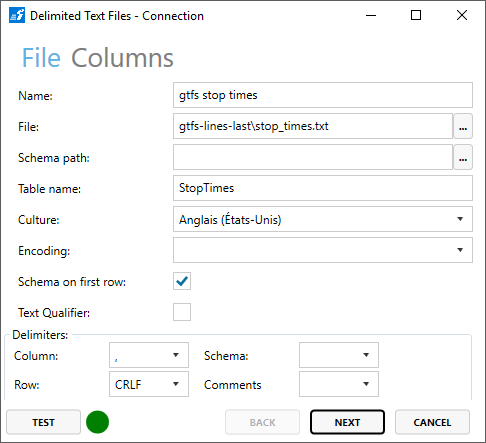
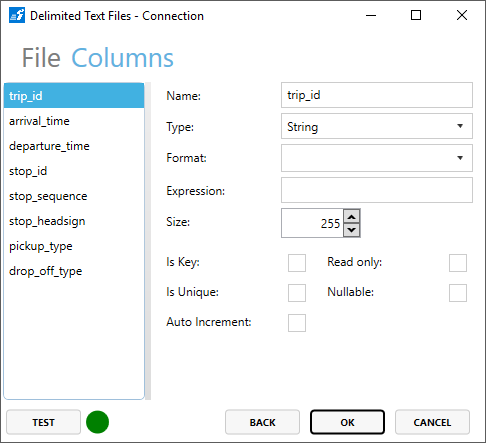
To create stop_times.txt file connection:
Right click on Connections node, in Solution Explorer pane.
Expand the Add connection menu.
Select Delimited Text File.
Fill the dialog box with the relevant values:
File Tab
Parameters
Values
Name
gtfs stop times
File
gtfs-lines-last\stop_times.txt
Schema path
Table Name
StopTimes
Culture
English (united states)
Encoding
Schema on first row
Yes
Text Qualifier
False
Column delimiter
,
Row delimiter
CRLF
Schema
Comments
Columns Tab
Column
Type
Nullable
Is Key
trip_id
String
arrival_time
String
departure_time
String
stop_id
String
stop_sequence
String
stop_headsign
String
True
pickup_type
String
True
drop_off_type
String
True
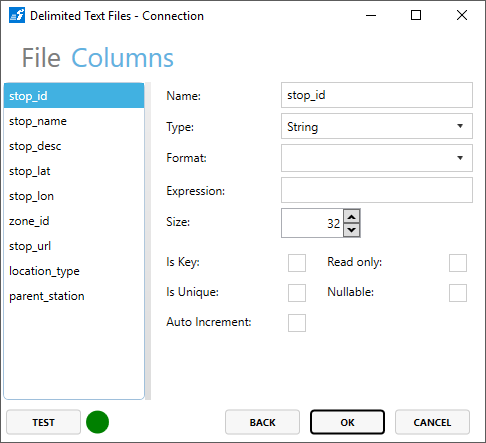
To create stops.txt file connection:
Right click on Connections node, in Solution Explorer pane.
Expand the Add connection menu.
Select Delimited Text File.
Fill the dialog box with the relevant values:
File Tab
Parameters
Values
Name
gtfs stops
File
gtfs-lines-last\stops.txt
Schema path
Table Name
Stops
Culture
English (united states)
Encoding
Schema on first row
Yes
Text Qualifier
False
Column delimiter
,
Row delimiter
CRLF
Schema
Comments
Columns Tab
Column
Type
Format
Is Key
stop_id
String
True
stop_name
String
stop_desc
String
stop_lat
Double
stop_lon
Double
zone_id
String
zone_id
String
stop_url
String
location_type
Byte
parent_station
String

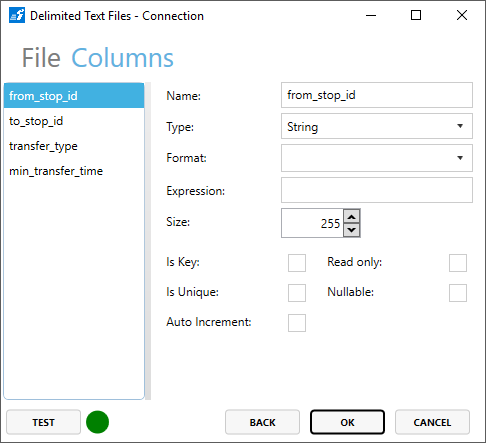
To create transfers.txt file connection:
Right click on Connections node, in Solution Explorer pane.
Expand the Add connection menu.
Select Delimited Text File.
Fill the dialog box with the relevant values:
File Tab
Parameters
Values
Name
gtfs transfers
File
gtfs-lines-last\transfers.txt
Schema path
Table Name
Transfers
Culture
English (united states)
Encoding
Schema on first row
Yes
Text Qualifier
False
Column delimiter
,
Row delimiter
CRLF
Schema
Comments
Columns Tab
Column
Type
Nullable
Is Key
from_stop_id
String
to_stop_id
String
transfer_type
Byte
min_transfer_time
Int32

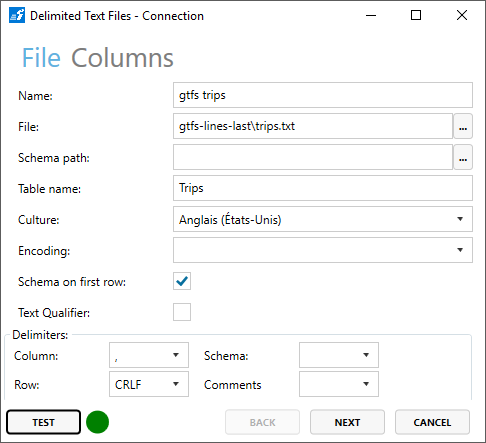
To create trips.txt file connection:
Right click on Connections node, in Solution Explorer pane.
Expand the Add connection menu.
Select Delimited Text File.
Fill the dialog box with the relevant values:
File Tab
Parameters
Values
Name
gtfs trips
File
gtfs-lines-last\trips.txt
Schema path
Table Name
Trips
Culture
English (united states)
Encoding
Schema on first row
Yes
Text Qualifier
False
Column delimiter
,
Row delimiter
CRLF
Schema
Comments
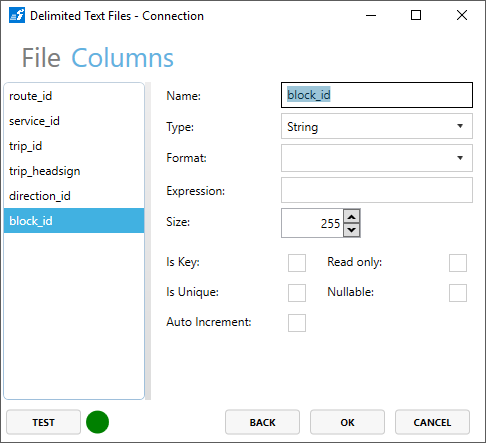
Columns Tab
Column
Type
Format
Is Key
route_id
String
True
service_id
String
trip_id
String
trip_headsign
String
True
direction_id
String
block_id
String
Basic concepts
One single model shares its elements with all the components in the application. This is a logical business model with tables, columns and relationships mapped to the data sources corresponding elements. At runtime, data extracted from the data sources is stored into these elements, starting an integration or analysis pipeline.
In this example, we will:
Map the CSV files as extraction source.
Map the SQL Server datasource as loading destination.
MAP THE CSV Files
To create the extraction mapping:
Right click on the Mappings node, in the Solution Explorer pane.
Add a new Extraction type mapping.
To create and map a new model:
Optionally, double click the New mapping node in the Solution Explorer pane.
Optionally, click
 to open the help popup.
Click on the create and map a new transfer model to the selected data source label.
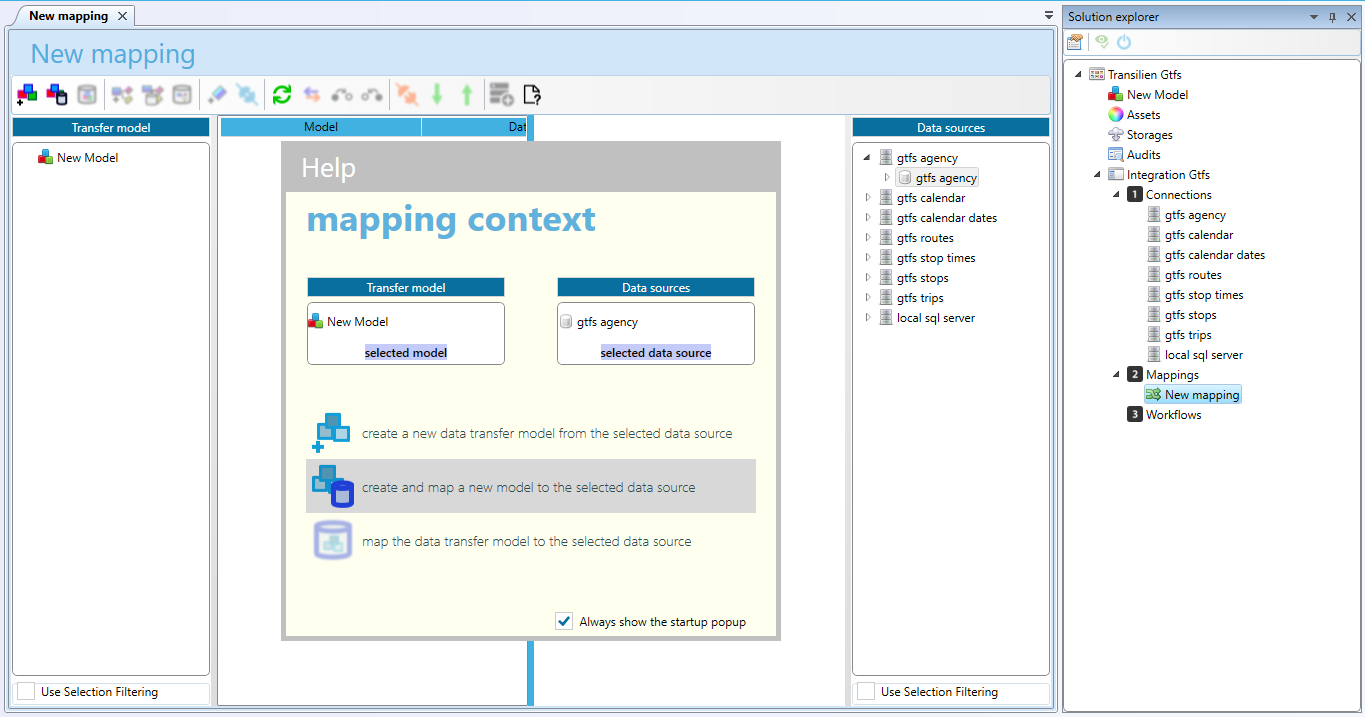
Right click the New mapping node in Solution Explorer and rename it Csv. Right click the model node in top of Solution Explorer and rename it Gtfs. |
To create and map a new Calendar table:
Optionally double click Csv mapping in Solution Explorer.
Click Gtfs node in Transfer model.
Expand gtfs calendar in Data Sources.
Expand gtfs calendar in Data Sources.
Click the Calendar table below gtfs calendar.
Click
 in Extract mapping toolbar to create and map a new class.
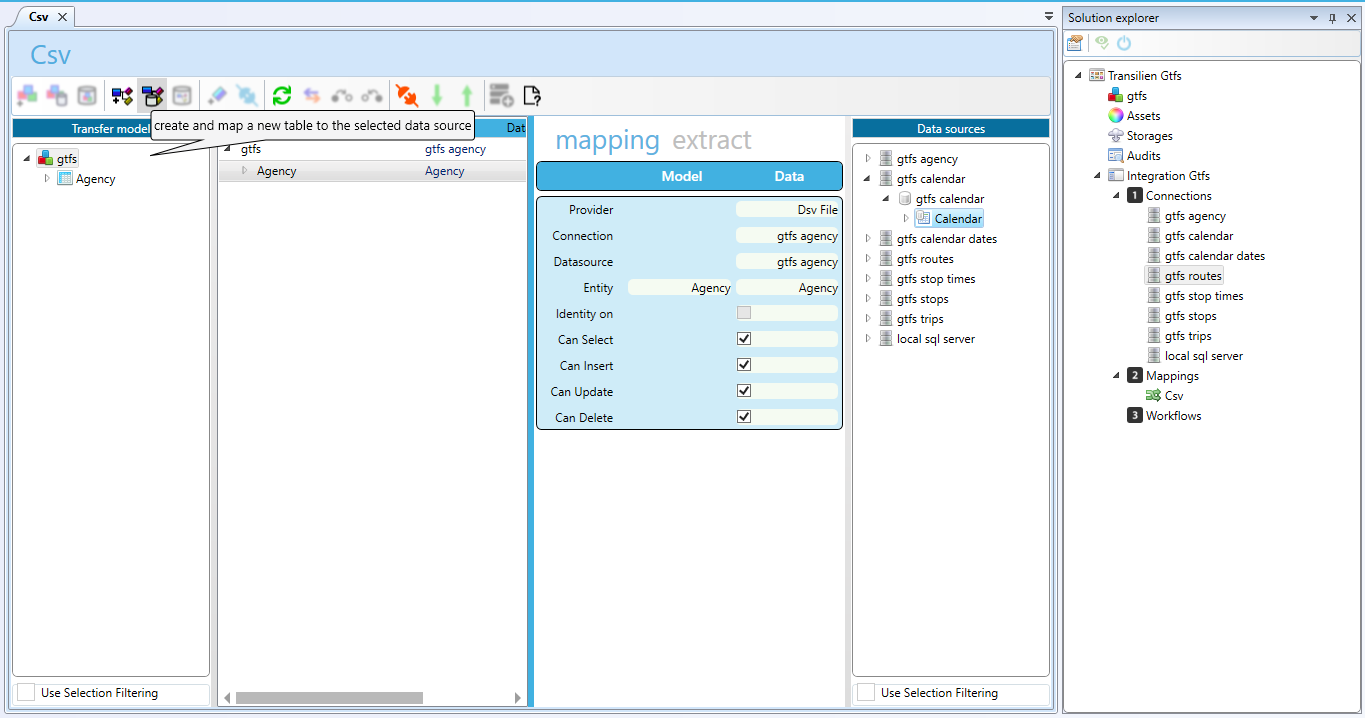
Right click on the New mapping node in Solution Explorer (or select it and press F2) and rename it Log Files. |
To create and map other tables:
Repeat 1 to 5 steps with gtfs calendar dates, gtfs routes, gtfs stop times, gtfs stops, gtfs trips.
MAP THE SQL SERVER DATABASE
To create the loading mapping:
Right click on the Mappings node, in the Solution Explorer pane.
Add a new >Loading type mapping.
To map the transfer model:
Optionally, optionally close help popup.
Click Gtfs node in Transfer model.
Expand local sql server in Data Sources.
Click below the Gtfs database
Click
 in the mapping pane toolbar to map the data transfer model to the selected data source.

Right click the New mapping node in Solution Explorer and rename it Sql Server. |
To add an analysis workflow:
|  |
Basic concepts
A trigger is a parameterized conditional procedure automatically executed on data flow events.
The Delete All Data trigger will automatically delete all the records in the Sql server database to prevent a primary key violation exception.
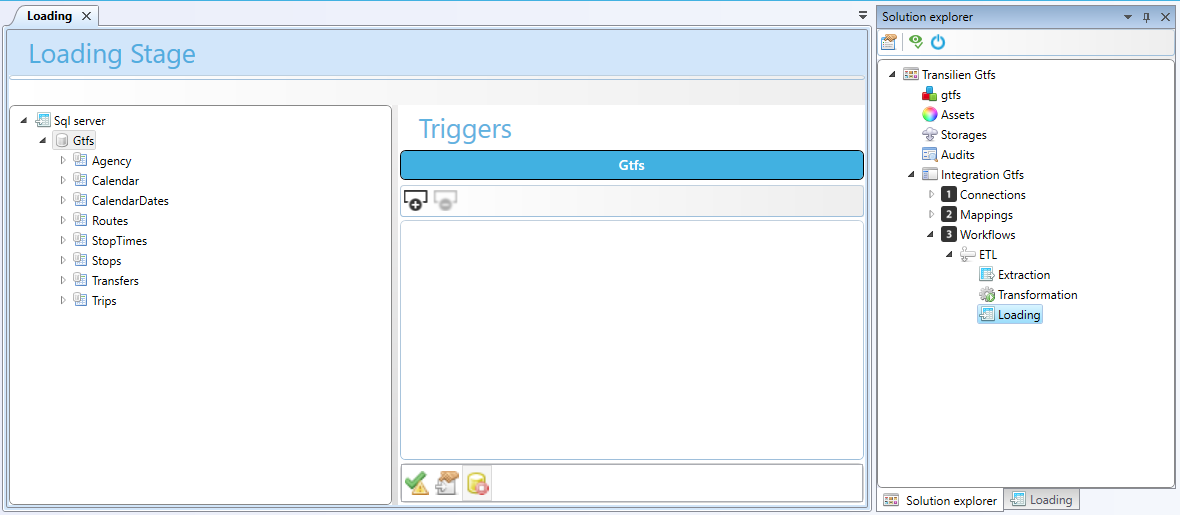
To add a delete data trigger:
Expand the ETL node in the Solution Explorer pane and double click on the Loading node.
Select the Gtfs source in the left pane tree of the Extraction Stage.
Double click on
 button in the bottom toolbar of the center pane.
To test the application
Click
 in Solution Explorer toolbar.
Click
 in Test New Application.
A default browser instance should be started.